Sunday, 17 October 2021

DevNet - Python module Urllib3 - user-friendly HTTP client

 Urllib3 is a HTTP client for python it can grab data, post data, stream data, work with JSON as well as use redirects.

Urllib3 can be installed using pip:

    python -m pip install urllib3

    or via GitHub:

    git clone git://github.com/urllib3/urllib3.git

    python setup.py install


code example:

 cat test_urllib 

#!/usr/bin/env python3


"""urllib3 module test"""


import urllib3


http = urllib3.PoolManager()

URL = 'http://dub-ne.blogspot.com'

resp = http.request('GET', URL)

print(resp.status)


- this example create GET request to www.dub-ne.blogspot.com and prints the return code of response, output:
 

python test_urllib 

200

- code 200 ("OK") indicates that the request has succeeded.


HTTP response code groups:

  • Informational responses (100–199)
  • Successful responses (200–299)
  • Redirects (300–399)
  • Client errors (400–499)
  • Server errors (500–599)


Urllib3 features:

  • Thread safety.
  • Connection pooling.
  • Client-side SSL/TLS verification.
  • File uploads with multipart encoding.
  • Helpers for retrying requests and dealing with HTTP redirects.
  • Support for gzip, deflate, and brotli encoding.
  • Proxy support for HTTP and SOCKS.
  • 100% test coverage.

Documentation: urllib3.readthedocs.io

DevNet - Parsing data formats in Pyton: JSON & YAML (basics)

JSON data code example.

- JSON file:


{ "node": 

  { "hostname": "Edge1", "details": { "interface":

   { "name": "Ethernet0", "description": "L2 Uplink", "enabled": "true"

   }

                                    }

  }

  }


- Python file:


#!/usr/bin/env python

""" simple code to parse json """

import json

with open("data.json", "r", encoding = "UTF-8") as file:

    data = json.load(file)

    print(data)


- Output: 


python parse_json.py

{'node': {'hostname': 'Edge1', 'details': {'interface': {'name': 'Ethernet0', 'description': 'L2 Uplink', 'enabled': ‘true'}}}}


*** of course we can narrow the output information by modifying print command to for instance:


print(data['node']['hostname'])


which would return only the hostname:

python parse_json.py

Edge1


*** there are four ways to be used when parsing data:
    - load() - import native JSON as Python dictionary 
    - loads() - import JSON data from the string
    - dump() - used to write JSON data from python objects into JSON file
    - dumps() - same as dump() except returns string, does not require file object

YAML example:

- YAML file:

cat data.yaml  

---

device:

    hostname: Edge1

    interface:

        name:Ethernet0

        description:Uplink

        enabled:true

...


- Python file:


cat parse_yaml.py 

""" parse YAML file simple example """

import yaml


with open ("data.yaml", "r", encoding = "UTF-8") as fdata:

    ydata = yaml.safe_load(fdata)

    print(ydata)


- Output


python parse_yaml.py

{'device': {'hostname': 'Edge1', 'interface': 'name:Ethernet0 description:Uplink enabled:true’}}


*** two functions are available with in YAML module:

   - yaml.load - to convert YAML data into Python
   - yaml.dump - to convert Python data back to YAML

-----

All files are available on my GitHub: https://github.com/lightarchivist/DevNetLabs

Sunday, 3 October 2021

DevNet - XML - Parsing Data Formats in Python

 We should think of data formats in terms of different ways of providing structure and consistency to present the data.


->XML - Python natively supports XML encoding and decoding. Parsing XML data is not straight forward way when compared to YAML and JSON.


The simplest way is to parse the XML file is to convert it to ordered dictionary using xmltodict module. Ordered dictionary is a subclass of dictionary in Python and it is used because it remembers the order of how the keys are inserted in to dictionary.


Example:


XML file:


<?xml version="1.0"?>

<device>

 <hostname>Edge1</hostname>

 <interface>

  <name>Ethernet0</name>

  <description>L2 Uplink</description>

  <enabled>true</enabled>

 </interface>

</device>


Install xmltodict module: pip install xmltodict


Python file:


import xmltodict

xmlFile = open ('lab.xml')

xmlData = xmlFile.read()

xmlFile.close()

xml_dict = xmltodict.parse(xmlData)

print(xml_dict)


Output after running Python script:


OrderedDict([('device', OrderedDict([('hostname', 'Edge1'), ('interface', OrderedDict([('name', 'Ethernet0'), ('description', 'L2 Uplink'), ('enabled', 'true')]))]))])


Additional info: link to tutorial how to use xml.etree.ElementTree module:


https://docs.python.org/3.8/library/xml.etree.elementtree.html


All examples are available on my GitHub: https://github.com/lightarchivist/DevNetLabs

Wednesday, 1 September 2021

DevNet - data formats [XML, JSON, YAML]

-> XML - Extensible Markup Language - platform neutral and data format. It has a tree like structure starting with a root element at the top and a parent/child relationship between elements. In below example device is the root element. First line in XML file is called prologue and it includes version and encoding information. Tags are used defined and usually documented by API provider. 

XML can be problematic to parse in Python due to the fact that the order of data is important Python module: xmltodict converts XML into ordered dictionary.

Example:

<?xml version="1.0" encoding=“UTF-8"?>
<!— example of comment in XML —>
<device>
<hostname>Edge1<hostname/>
<interface>
<name>Ethernet0</name>
<description>L2 Uplink</description>
<enabled>true</enabled>
</interface>
</device>


Keep in mind: in XML whitespace is insignificant

-> JSON - JavaScript Object Notation - data structure that comes from Java programming language but it is not limited to it and can be used independently. Data objects in JSON are comma separated key/value pairs which can be nested to create hierarchy/structure of data model. following are examples of supported data types: Strings, numbers, booleans or nulls.


Example:


{ "node":

  { "hostname": "Edge1", "details": { "interface":

   { "name": "Ethernet0", "description": "L2 Uplink", "enabled": "true"

   }

                                    }

  }

  }


Keep in mind: JSON does not support comments unlike XML or YAML, whitespace is insignificant and used to help with human readability.


-> YAML - YAML Ain’t Markup Language - human friendly data format that can be used with all programming language. Syntax is very minimal, YAML file opens with three dashes (“—-”) and close with three dots (“…”), hash and a space (“# ”) indicates comment. 


Example:


---

device:

    hostname: Edge1

    interface:

        name:Ethernet0

        description:Uplink

        enabled:true

...


To work with YAML 


Keep in mind: YAML parsers can parse JSON as well. White space is significant, indentation with a use of space (not Tab) indicates hierarchy and it should be consistent.


Sunday, 22 August 2021

Automation is simple - Netmiko is great

While back in the galaxy far away I was asked to write a script to pull the data from all the remote nodes.  As I was unable to use Ansible as it would not work after quick research I realized Netmiko was the answer. I found Kirk Byers GitHub here: https://github.com/ktbyers/netmiko/tree/develop/netmiko and modify one of his examples for my own purpose.

The differences from the original script by Kirk Byers is that I am using loop and store password so I don't need to enter it every time script logs to another device as well as I am collecting logs for troubleshooting purposes. Initially I use the script to pool licensing data but as it usually happens the script due to its simplicity was used for other tasks.

Below is the modified version of the script that can be used to change/add local used on Huawei nodes and verify if the user account is working. Beside a script itself there are two other text files required one with list of all nodes and the second with the list of commands to be executed (which i am not going to publish here). Third file "verification" is run for verification purposes

Script:

#!/usr/bin/env python

from __future__ import print_function, unicode_literals


# this script adds new local user for all devices included ipListOfNodes file


import logging


# Netmiko is the same as ConnectHandler

from netmiko import ConnectHandler, redispatch

from netmiko import Netmiko

from getpass import getpass


# logging for troubleshooting purposes

logging.basicConfig(filename='test.log', level=logging.DEBUG)

logger = logging.getLogger("netmiko")


hostFile = open ('ipListOfNodes','r')

hostList = hostFile.readlines()

hostFile.close()


# admin password

mypass = getpass()


# new password for the new local user

adpass = getpass()


# adjust aaa settings and save

for device in hostList:

    huawei = {

        "host": device,

        "username": "username",

        "password": mypass,

        "device_type": "huawei",

                }

    net_connect = Netmiko(**huawei)

    output = net_connect.send_config_from_file("change_file.txt")

    print(output)

    net_connect.disconnect()


# verify admin user and pwd

for device in hostList:

    huawei = {

        "host": device,

        "username": "admin",

        "password": adpass,

        "device_type": "huawei",

                }

    net_connect = Netmiko(**huawei)

    output = net_connect.send_config_from_file("verification")

    print(output)

    net_connect.disconnect()

Script require user who is making a change to type his password and new user password at the very beginning.

Logs to all devices make a change then logs again to all devices with new user name and credentials and can run commands from verification file.


For troubleshooting purposes script sends logs to test.log file. 

More scrips will be available here: https://github.com/lightarchivist/DevNetLabs

Saturday, 13 February 2021

Lab topology


 I am currently preparing for Cisco 300-715 SISE exam. I thought I will share my lab diagram and I will follow with some configuration examples in my next posts starting with configuration of access layer switch {NAD}. There few more elements that I am planning to add but this will happen in the future.

Lab overview:

- Dell T1700 (quad core Xeon + 16GB RAM) running VMware ESXi

- Cisco ASA 5505 (also have Cisco ASA 5520) later on I will connect other physical devices to it for instance physical switches,WLC an AP


I should add, just for SISE exam this topology is a bit of an over kill, but it comes handy with every day work.


UPDATE: Passed Cisco SISE 300-715 exam!

Wednesday, 23 September 2020

FlexVPN - Site-to-Site (1)

IKEv2
 
Few words on IKEv2:

-    described in RFC 7296 (initially RFC 5996)
-    offers dynamic key exchange and peer authentication
-    addresses measures to fix vulnerabilities of IKEv1 (anti-DoS)
-    supports Extensible Authentication Protocol (EAP)
-    it is not backward compatible with IKEv1
-    operates in two phases
-    industry standard, can operate in multivendor environment


IKEv2 operation:
-    Phase 1 is IKE_SA it consist a message pair IKE_SA_INIT (key exchange policy)
-    Phase 2 is CHILD_SA, first message pair is IKE_AUTH, additional CHILD_SA can be sent for rekey and information messages (data policy) 


R1 is the Initiator / R2 is the Responder

SA – security association
KE – Key exchange
Nr,Ni – Nonce
Cert-Req – Certificate Request
Cert – Certificate
IDi – Identification (Initiator/Responder)
TSi – Traffic selector – Initiator
TSr – traffic selector – Responder

 
IKEv2 authentication methods:
-    pre-shared keys (PSK)
-    digital signatures
-    EAP


IPSec 


IPSec consist of two main security protocols:
- Authentication Header (AH- IP protocol ID  51) – used for authentication and Integrity, enforces anti replay protection (receiving host sets replay bit in the header). AH is applied to datagram only.
- Encapsulation Security Payload (ESP- IP protocol ID 50) – used to provide confidentiality (encryption), data origin authentication, integrity, optional anti-replay service. Performs encryption at the IP packet layer, support symmetric algorithms by default 56-bit DES.

The AH can be applied alone or together with the ESP.

IPSec supports following standards:
-    Data encryption standard (DES), Triple DES (3 DES)
-    Delffie – Hellman (D-H)
-    Message Digest 5 (MD5)
-    Rivest, Shamir, and Adelman (RSA) signatures
-    IKEv1/v2
-    Certificate Authorities


IPSec operates in two modes:
-    Tunnel mode – A new IP header is created in place of the original this allow for encryption of entire original packet. Tunnel mode is used to encrypt traffic between secure IPSec Gateways i.e. Site to Site VPN or Cisco VPN Client and a IPSec Gateway.
-    Transport mode – The AH or ESP is inserted behind the IP header, the IP header can be authenticated but not encrypted. Use example would be an encrypted Telnet or Remote Desktop session from a workstation to a server.
In transport mode IP header is exposed.


Smart Defaults – this feature minimize FlexVPN configuration process. For example is following configuration steps can be skipped:
-    IKEv2 Proposal
-    IKEv2 Policy
-    IPSec transform-set
-    IPSec profile


default values will be picked, to verify default values:
-    sh crypto ikev2 proposal
-    sh crypto ikev2 policy
-    sh crypto ipsec transform
-    sh crypto ipsec profile


The think to remember is to use “default” as a name for the ikev2 profile.


LAB. Site to site FlexVPN with SVTI (using smart defaults)


RTR-01

crypto ikev2 keyring FlexVPN

 peer rtr-02

  address 20.0.0.1

  pre-shared-key local cisco

  pre-shared-key remote cisco


crypto ikev2 profile default

 description --->Basic FlexVPN<---

 match identity remote address 0.0.0.0

 authentication remote pre-share

 authentication local pre-share

 keyring local FlexVPN


crypto ikev2 dpd 10 3 on-demand


interface Tunnel200

 description FlexVPN-to-rtr-02

 ip address 10.120.0.1 255.255.255.252

 tunnel source Ethernet1/1

 tunnel mode ipsec ipv4

 tunnel destination 20.0.0.1

 tunnel protection ipsec profile default


RTR-02

crypto ikev2 keyring FlexVPN

 peer rtr-01

  address 10.0.0.1

  pre-shared-key local cisco

  pre-shared-key remote cisco


crypto ikev2 profile default

 description --->Basic FlexVPN<---

 match identity remote address 0.0.0.0

 authentication remote pre-share

 authentication local pre-share

 keyring local FlexVPN


crypto ikev2 dpd 10 3 on-demand


interface Tunnel200

 description FlexVPN-to-rtr-01

 ip address 10.120.0.2 255.255.255.252

 tunnel source Ethernet1/0

 tunnel mode ipsec ipv4

 tunnel destination 10.0.0.1

 tunnel protection ipsec profile default


Verification:

RTR-01-HUB#show crypto ikev2 sa detailed
 IPv4 Crypto IKEv2  SA

Tunnel-id Local                 Remote                fvrf/ivrf            Status
1         10.0.0.1/500          20.0.0.1/500          none/none            READY
      Encr: AES-CBC, keysize: 256, Hash: SHA512, DH Grp:5, Auth sign: PSK, Auth verify: PSK
      Life/Active Time: 86400/248 sec
      CE id: 1001, Session-id: 1
      Status Description: Negotiation done
      Local spi: 6445B887B3DC849B       Remote spi: CB227544A6FD4612
      Local id: 10.0.0.1
      Remote id: 20.0.0.1
      Local req msg id:  2              Remote req msg id:  0
      Local next msg id: 2              Remote next msg id: 0
      Local req queued:  2              Remote req queued:  0
      Local window:      5              Remote window:      5
      DPD configured for 10 seconds, retry 3
      NAT-T is not detected
      Cisco Trust Security SGT is disabled
      Initiator of SA : Yes

 IPv6 Crypto IKEv2  SA

RTR-01-HUB

RTR-02#show crypto ikev2 sa detailed
 IPv4 Crypto IKEv2  SA

Tunnel-id Local                 Remote                fvrf/ivrf            Status
2         20.0.0.1/500          10.0.0.1/500          none/none            READY
      Encr: AES-CBC, keysize: 256, Hash: SHA512, DH Grp:5, Auth sign: PSK, Auth verify: PSK
      Life/Active Time: 86400/159 sec
      CE id: 1001, Session-id: 1
      Status Description: Negotiation done
      Local spi: CB227544A6FD4612       Remote spi: 6445B887B3DC849B
      Local id: 20.0.0.1
      Remote id: 10.0.0.1
      Local req msg id:  0              Remote req msg id:  2
      Local next msg id: 0              Remote next msg id: 2
      Local req queued:  0              Remote req queued:  2
      Local window:      5              Remote window:      5
      DPD configured for 10 seconds, retry 3
      NAT-T is not detected
      Cisco Trust Security SGT is disabled
      Initiator of SA : No

 IPv6 Crypto IKEv2  SA


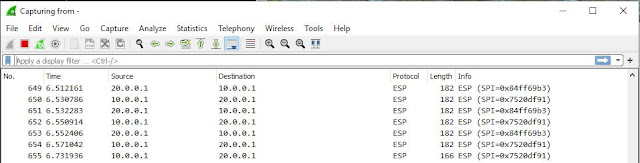
Wireshark capture of the test ping from rtr-01 to rtr-02.


Plumbing... QoS

Rule no 1. QoS does not help in situations where there is no enough bandwidth but helps optimize performance by prioritization of the traffi...